
# Local environment
This section explains how to set up a local environment for development purposes.
# Default setup
Normally, we provide a default setup for contributors. It means that you don't need anything to install and setup except the shopware-pwa application installed locally. shopware-pwa uses a public API that the core team manages, tailored to just work with the frontend application.
# Why to have it all locally?
There are many reasons why you may want to have a whole stack (shopware-pwa + shopware 6) locally. Most important are:
Full control
Local instane can be updated anytime you want, as same as making changes in the settings through an admin panel - you can change many scenarios fast without help from people outside.
Easy debugging
Having Shopware 6 instance locally gives you a direct access to the logs, files and other env specific settings that cannot be accessed from the admin panel.
Shared instance is not affected
You can easily adjust the environment for your needs (for instance a different version of shopware 6) that can be temporary without disturbing a state of API for other users. The catalog inventory, draft CMS pages are also available only for your personal usage and nobody sees it.
# Shopware instance in 10 seconds*
Dockware.io (opens new window) comes with help to run your Shopware 6 (v5 is also available) on your local environment and that's not all. It provides ready-to-use docker (opens new window) images that can be executed everywhere, even on the server.
There are 3 modes there:
- play ready in 10 seconds*
- dev in 3 minutes*
- contribute in 5 minutes*
* it will take more if docker has to pull an image when it's not available locally.
Choose one depending on your needs. People from Dockware project take care of docker images' availability, but they are really up to date for every Shopware v6 release!
# Let's do it
Let's assume that you want to contribute a shopware-pwa project and you do have your reasons to work with a very own Shopware 6 instance.
# Installing Shopware 6 instance & shopware-pwa setup
The only requirement for your system is to have a docker on your computer. Follow the instructions (opens new window).
Create a
docker-compose.ymlfile somewhere, containing following content:version: "3" services: shopware: image: dockware/play:latest container_name: shopware ports: - "80:80" networks: - web networks: web: external: false ``` > NOTE: It's possible to use only one command and nothing more (`docker run --rm -p 80:80 dockware/play:latest `), but the storage for database and the code (including installed plugins) aren't persisted and **will disappear** when the container is stopped. More details for such option [here](https://docs.dockware.io/use-dockware/first-run).Run
docker-compose upbeing where the file created in previous step is placed.After the docker container is executed, you will see the output of Dockware stack, like:
shopware    | WOHOOO, dockware/dev:6.3.5.1 IS READY :) - let's get started
shopware    | -----------------------------------------------------
shopware    | DOCKWARE CHANGELOG: /var/www/CHANGELOG.md
shopware    | PHP: PHP 7.4.15 (cli) (built: Feb  7 2021 12:21:51) ( NTS )
shopware    | Apache DocRoot: /var/www/html/public
shopware    | ADMINER URL: http://localhost/adminer.php
shopware    | MAILCATCHER URL: http://localhost/mailcatcher
shopware    | PIMPMYLOG URL: http://localhost/logs
shopware    | SHOP URL: http://localhost
shopware    | ADMIN URL: http://localhost/admin
shopware    |
shopware    | What's new in this version? see the changelog for further details
shopware    | https://www.shopware.com/de/changelog/
SHOP URL and ADMIN URL are already here, there is nothing more needed to start working with the Shopware 6 instance.
NOTE: default admin panel credentials are
login: admin
password: shopware
Install a SwagShopwarePwa plugin (opens new window).
5.1. Download a plugin packed in a zip file from github: master version (opens new window).
5.2. Log in to the admin panel at http://localhost/admin (opens new window) using default credentials (admin / shopware)
5.3. Go to Setting > System > Plugins (opens new window) and click
Upload pluginbutton.5.4. When the plugin is uploaded - just install and activate it. That's all. Shopware 6 is shopware-pwa ready now!
Install shopware-pwa.
There are two possible scenarios: contribution & regular project. Depending on what you want, the paths you need go through are a little bit different.
6.1. Regular project (the Shopware 6 instance is up and running and you want to connect a PWA through the API)
Create a project using CLI
npx @shopware-pwa/cli initAnswer the questions during project initialization and that's it.
There is
shopware-pwa.config.jsfile in your root project's folder. You can edit it anytime.The next (6.) point shows how to get required data from local Shopware 6 instance.
Fork a repo and clone it locally
git clone git@github.com:vuestorefront/shopware-pwa .Install packages in main directory
yarnBuild local packages & init a test project
yarn startAfter that, go to
test-projectsubfolder and editshopware-pwa.config.jsfile which may look like by default:module.exports = { shopwareEndpoint: "http://localhost:8000", shopwareAccessToken: "SWSC40-LJTNO6COUEN7CJMXKLA", shopwareDomainsAllowList: ["http://localhost:3000"], };
There are some useful commands to make development work easy:
yarn dev:<package name\*>for example:
yarn dev composables- package name can be one of: client, composables, helpers, nuxt-module and allows to HMR related packages that are used internally.
default-themepackage is an exception - you need to go tosrc/packages/default-themeand then runyarn devto see the changes in real time.The next (7.) point shows how to get required data from local Shopware 6 instance.
Get an access token and other required data of local Shopware 6 instance's sales channel for shopware-pwa config file and not only!
The basic information the shopware-pwa needs are contained in the
shopware-pwa.config.jsfile:shopwareEndpoint: "https://pwa-demo-api.shopware.com/prev/", shopwareAccessToken: "SWSC40-LJTNO6COUEN7CJMXKLA", shopwareDomainsAllowList: ["https://pwa-demo-api.shopware.com/prev/"],Data for local shopware 6 instance will be different.
How to get them?
shopwareEndpoint - it's your
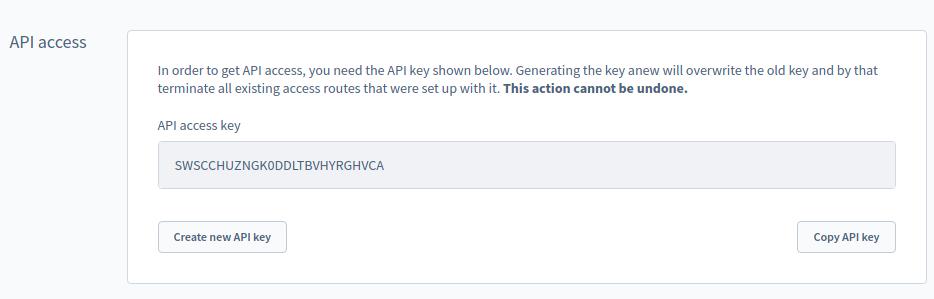
http://localhostdefault on port80shopwareAccessToken
go to http://localhost/admin
then log in (using default admin/shopware credentials)
choose Storefront sales channel in the side menu

copy the API key from section named API access
shopwareDomainsAllowList - is the list of hostnames the shopware-pwa may be hosted, locally it would be
http://localhost:3000, so an option would be:shopwareDomainsAllowList: ["http://localhost:3000"]
Synchronize frontend with backend settings.
Everytime the
shopware-pwa.config.jschanges, some commands should be run to synchronize backend and frontend application.8.1. sychronize domains config (NECESSARY)
yarn shopware-pwa domains8.2. synchronize plugins (optional)
yarn shopware-pwa pluginsshopware-pwa is ready to run
yarn dev