
# Cookbook
This content is not intended for contribution purposes.
# Table of contents
- How to init a project for my ecommerce (not a contribution)
- Can I build a docker image with shopware-pwa inside?
- How to change the Shopware6 API credentials
- How to upgrade an existing project
- How to customize or extend default shopware-pwa look
- How to use/write your own theme
- How to install and register a nuxt plugin
- How to add another language
- Overwrite API defaults
# 1. How to init a project for my ecommerce
Prepare your Shopware6 instance, first. To do so, check required steps here (Shopware setup paragraph).
Being in empty directory, run
npx @shopware-pwa/cli initAnswer a few basic questions:

That's it! Now you have a nuxt project with shopware-pwa installed.
You can work with the project in development mode:
yarn dev, or when it's ready for production:yarn buildto generate the production build.
# 2. Can I build a docker image with shopware-pwa inside?
- Init the project first, see point #1
- Build the project with command
yarn build(it's important, because the Dockerfile does not build a nuxt project at all - copy the files only) - Notice that there is a
Dockerfilein the project's root directory - Now you can build a docker image, for instance:
docker build -t "shopware-pwa:1.0.0" .(name your image freely, point the context to current directory ".") - After the build is done, you can run the image wherever you like:
docker run -p80:3000 shopware-pwa:1.0.0 - The container has started the nuxt application, directs the traffic from port 80 to the 3000 inside the container.
# 3. How to change the Shopware6 API credentials
Edit
shopware-pwa.config.jsfile, located in generated project's directory.Adjust the
shopwareEndpointandshopwareAccessTokento your needs
module.exports = {
  shopwareEndpoint: 'http://localhost:8000',
  shopwareAccessToken: 'SWSCDM5YUNVUZ3ZRUHHBMGNVTG',
}
yarn devoryarn buildcommand will take the latest credentials of your config file.
# 4. How to upgrade an existing project
- shopware-pwa is hidden under only one module named
@shopware-pwa/nuxt-modulewith all its dependencies. - You can upgrade the
package.jsondirectly, or just init the project once again withnpx @shopware-pwa/cli initcommand. - After doing this, visit Upgrade page for more information if there are some additional steps needed.
# 5. How to customize default shopware-pwa look
It's better to know what's hidden over the CMS in Shopware 6: visit Shopping Experiences because category pages, product listings are made of it.
You can customize the default-theme by overriding the specific Vue components, or just changing the styling. In order to understand how id works, let's see what a project's structure looks like
src/ directory
.
├── assets
│   └── scss
│       ├── main.scss       - write your own styling
│       └── variables.scss  - control the general appearance by changing the predefined variables
├── components              - here go the components you need, overriden ones as well as the new one
│   └── SwAddress.vue       - here the overriden SwAddress component is located
├── layouts
├── middleware
├── pages
│                           - place a spacific pages here, override current ones
├── plugins                 - extend the project with a nuxt plugin
├── static
│   ├── favicon.ico
│   └── icon.png
└── store                   - for vuex purposes
In general, the generated project is a Nuxtjs (opens new window) project. This is why the structure is the same, and the behavior of nuxt is kept. Thanks to this you can customize the generated project as much as you want without losing the fancy features that nuxtjs provides.
By default, everything you put into this structure can extend, or modify the @shopware-pwa/default-theme link to the package (opens new window).
# The most popular use cases
I want to add a new tab in product details page.
See how to customize an existing Vue component using shopware-pwa CLI here
- use
npx @shopware-pwa/cli overridecommand - pick up the
/SwProductTabs.vuecomponent - the component is being copied from
@shopware-pwa/default-themepackage, and then placed insrc/componentsready to edit. - now your shopware-pwa project uses your local
SwProductTabs.vueinstead of the one from default-theme.
- use
I want to add additional page, like
/instagramthat connects to the Shopware6 API to get and show some data- create
instagram.vuefile insrc/pages - implement a template, a
<script></script>block which can have some logic, and style block maybe - utilize the
invokeGet, invokePost...from@shopware-pwa/shopware-6-clientpackage or any library (likeaxios) to make some requests you need
It may look like:
<template> <div class="sw-instagram"> <div v-if="posts.length"> <InstagramPost v-for="post in posts" :post="post" /> </div> <div v-else> <span>no posts found</span> </div> </div> </template> <script> import { getApplicationContext } from "@shopware-pwa/composables" import { invokePost } from "@shopware-pwa/shopware-6-client" import { onMounted, ref } from "@vue/composition-api" export default { name: "SwInstagramPage", setup(props, { root }) { // get the configured api client const { apiInstance } = getApplicationContext(root, "SwInstagramPage") const posts = ref([]); onMounted(async () => { // make an API call to get the instagram posts through Shopware6 API // let's assume you have an appriopriate module installed and an endpoint exposed try { const postsResponse = await invokePost({ limit: 10, hashtags: "#great #clothes" ... }, apiInstance) // if you provide the current apiInstance you will have set a proper credentials (current context token) if(postsResponse.data) { posts.value = postsResponse.data } } catch (error) { console.error("SwInstagramPage:onMounted", error); } }) return { posts } } } </script> <style lang="scss" scoped> </style>- create
I want to write my own plugin to disable the "Add to cart notifications" feature.
- create
disable-notification.jsfile insrc/pluginsdirectory - the created file is treated like normal nuxt plugin with an access to current context
the plugin may look like this:
import { useIntercept, INTERCEPTOR_KEYS } from "@shopware-pwa/composables"; import { addToCartNotification } from "@shopware-pwa/default-theme/logic/notifications"; export default ({ app }) => { // import a disconnect method from useIntercept composable const { disconnect } = useIntercept(); // pass the interceptor key you want to change, and pass the function to be removed from event dispatcher disconnect(INTERCEPTOR_KEYS.ADD_TO_CART, addToCartNotification); };- once the plugin is created, you need to reload the nuxt app to have it working in the project
- create
# 6. How to use/write your own theme
shopware-pwa enables to provide a theme by providing its code-name in
shopware-pwa.config.jsfile, under thethemeproperty. The theme structure MUST be compatible with a nuxt project.
a sample config file shopware-pwa.config.js:
module.exports = {
  shopwareEndpoint: "http://localhost:8000",
  shopwareAccessToken: "SWSCDM5YUNVUZ3ZRUHHBMGNVTG",
  theme: "very-own-theme",
};
# How a custom theme can be resolved by shopware-pwa:
shopware-pwa looks for the local directory with corresponding name, as same as the theme provided in
shopware-pwa.config.jssample above. So<PROJECT_ROOT_DIR>/very-own-themewill be checked if the compatible theme (the nuxt structure) is located.shopware-pwa tries to resolve the package from npm, located in your
node_modules, so if you already have a theme installed via npm or yarn in project's directory, you are able to use it.
# How create a custom theme
Being in project's root directory use a CLI command to generate the theme:
npx @shopware-pwa/cli create-theme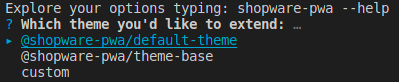
Choose the theme you would like to extend
The theme is created under the directory with name (code) that you provided in 1. step
The
package.jsonfile contains thebaseThemevalue with the theme you extend. The files property contains only adistdirectory (it's used during the build, and the files from dist are published as a package)
WARNING
Please remember that the custom theme should be built before any usage.
That means that before starting a nuxt application, the custom theme should be prepared by using:
yarn dev or yarn build - to be sure, please check if dist/ directory isn't empty in your custom theme.
# There are two useful scripts as well:
yarn dev- executesshopware-pwa dev-theme- watch for changes within custom theme's files, located in
src/dir - copies the theme files into
dist/subdir from: base theme (if any provided) andsrc/directory - thanks to this the package is always up to date and can be linked and used with HMR during the main project's build
- watch for changes within custom theme's files, located in
yarn build- executesshopware-pwa build-theme- copies the files from a pointed base theme and put it into the
dist/copies the new files fromsrc/and overwrite files indist/if there are matching ones
- copies the files from a pointed base theme and put it into the
# How to use a custom theme
Add an entry in
shopware-pwa.config.jswith thethemepropertyyarn devoryarn builddepending on your needsThe result of dev mode would be like this:
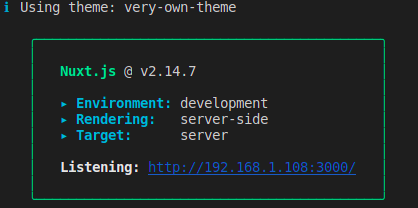
notice that there is a
Using themeinformation above the Nuxt.js output - it points your custom theme now.
# 7. How to install and register a nuxt plugin
The main project's config file is still a nuxt.config.js, so there is no problem to use it anyway.
Let's try to install a Google Tag Manager for Nuxt.js (opens new window), here's what we need (copied from package's readme):
- run
yarn add @nuxtjs/gtmornpm install @nuxtjs/gtminside the project - Add @nuxtjs/gtm to the modules section of
nuxt.config.js
import extendNuxtConfig from "@shopware-pwa/nuxt-module/config";

export default extendNuxtConfig({
  modules: ["@nuxtjs/gtm"],
  gtm: {
    id: "GTM-XXXXXXX",
    enabled: true, // for dev
    debug: true, // for dev,
    pageTracking: true, // push route change event automatically
  },
});
- Now the GTM module is enabled and ready to use
# 8. How to add another language
TIP
Before you start, learn about routing in Shopware PWA itself. As an additional resource learn the details regarding the mechanism itself.
# Things that should be done in admin panel
In admin panel, go to Sales Channel (used by PWA) > Domains tab
Add domain. It's important that the URL should match the one used in your
shopware-pwa.config.jsunder theshopwareDomainsAllowList(array of allowed hosts).Add a distinctive suffix pointing to language (or general config) you want to use. It may be
/de-DE,/enor whatsoever like/my/very/formal/english/site, so the whole entry would be like:https://my-shopware-pwa.com/my/very/formal/english/site.Domain host may be completely different, for instance:
- for en-GB
https://shopware.com - for de-DE
https://shopawre.de
- for en-GB
Pick the other settings for your domain like language, currency.
Save the domain and the sales channel afterwards.
# Things that should be done in shopware-pwa app
- Go to project's root directory.
- Run
npx @shopware-pwa/cli domains. - Pass the credentials for your admin credentials.
- In the end the Shopware domains refreshed notice should be displayed.
- the
.shopware-pwa/sw-plugins/domains.jsonshould contain the previously created.domain as an another entry. - Run a nuxt.js application again.
# FAQ
How to change the language switcher's label (visible in top navigation bar)?
- go to
.shopware-pwa/sw-plugins/domains.jsonand edit a chosenlanguageLabelproperty.
# 9. Overwrite API defaults
You can have full control over API defaults ued by composables.
First you need to add import inside shopware-pwa.config.js file.
const defaultsConfigBuilder =
  require("@shopware-pwa/nuxt-module/api-defaults").default;
Now we could have many abilities to edit the config, I'll leave the API with examples
# Adding new value
// merge object (including arrays), in this case add one value to array
defaultsConfigBuilder().add("useCms.includes.cms_page_slot",  "someCustomValue")

// result for defaultsConfigBuilder().get("useCms.includes.cms_page_slot")
[
  'id',
  'type',
  'slot',
  'blockId',
  'config',
  'data',
  'backgroundMediaMode',
  'backgroundMedia',
  'someCustomValue',
]
# Removing value
// merge object (including arrays), in this case add one value to array
defaultsConfigBuilder().remove("useCms.includes.cms_page_slot",  "type")

// result for defaultsConfigBuilder().get("useCms.includes.cms_page_slot")
[
  'id',
  'slot',
  'blockId',
  'config',
  'data',
  'backgroundMediaMode',
  'backgroundMedia',
]
# Replacing value
defaultsConfigBuilder().replace("useCms.includes.cms_page_slot", [
  "id",
  "myValue",
]);
// another examples
defaultsConfigBuilder().replace("useCms", { limit: 3 }); // replace whole useCms setting
defaultsConfigBuilder().replace("useCms.limit", 5);
# Implementation details for some cases
addwould replace value if it's not an object or array, for example withlimitproperty- you could chain methods like
defaultsConfigBuilder().add(...).remove(...).add(...)
# 10. Enabling Vuex store
If you need to enable Vuex store in your project, you need to add flag in nuxt.config.js:
// example nuxt.config.js
import extendNuxtConfig from "@shopware-pwa/nuxt-module/config";

export default extendNuxtConfig({
  head: {
    title: "Shopware PWA",
    meta: [{ hid: "description", name: "description", content: "" }],
  },
  shopware: {
    enableVuex: true,
  },
});